

An installed Palworld dedicated server can be tailored to your group through its active PalWorldSettings.ini. This file controls settings including the join password, allowed platforms, player capacity, and base limits. The key is to edit the file under the server installation’s configuration directory: changing DefaultPalWorldSettings.ini does not apply your settings, according to Pocketpair’s server documentation.
This guide assumes a self-managed dedicated server that has already been installed and started at least once: Windows through Steam or SteamCMD, or Linux through SteamCMD. It covers locating the active file, choosing direct or community access, setting limits, and checking how players join after a restart. A locally hosted co-op world and a hosting provider’s control panel use different setup paths.
Find the Active Configuration and Stop the Server
The configuration directories appear after the server’s first start. These paths begin at the usual steamapps directory; a custom SteamCMD installation moves that part of the path. Use the installation that actually runs your server.
- Windows, Steam or SteamCMD:
steamapps\common\PalServer\Pal\Saved\Config\WindowsServer\PalWorldSettings.ini - Linux, SteamCMD:
steamapps/common/PalServer/Pal/Saved/Config/LinuxServer/PalWorldSettings.ini
Stop the server before editing. If AdminPassword is already configured, press Enter in the game and enter /AdminPassword <the password you set>, followed by /Save and /Shutdown 60 Maintenance. /Save saves the world data; the shutdown command gives players the message “Maintenance” and stops the server after 60 seconds. Keep the administrator password private. If you have not configured one yet, wait until the server is stopped through your usual management method before editing. Pocketpair’s command reference requires an administrator password to be configured beforehand.
Make a private copy of the existing PalWorldSettings.ini, then edit the original at the active path. Only if that file is absent should you copy DefaultPalWorldSettings.ini from the PalServer installation folder to the stated destination. Do not replace an existing configuration with the default template. Change the relevant entries in the valid file and preserve the remaining settings.
Choose Access and Crossplay Settings
ServerPassword is the password players need to join. AdminPassword grants administrator privileges and serves a separate purpose. You can also set ServerName and ServerDescription. CrossplayPlatforms controls allowed platforms; Pocketpair documents the default as (Steam,Xbox,PS5,Mac). Its server guide identifies Steam, Xbox and the Windows Microsoft Store version, macOS, and PS5 as client platforms. The server host covered here runs on Windows or Linux. Use CrossplayPlatforms to restrict access: the older AllowConnectPlatform entry is unavailable in the current parameter reference.
Next, choose how players will find the server. Players join a standard dedicated server by entering its IP address and port in the field below the server list. A community server is a dedicated server listed in the game client. Pocketpair says Xbox and PS5 players need that community server setup to join. Listing and password protection are separate choices: a listed server can still require a join password.
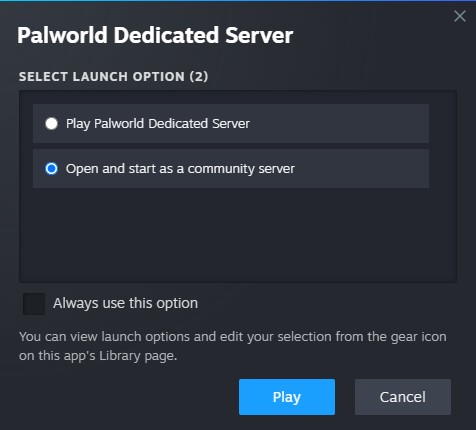
To list a server started through Steam, select exactly Open and start as a community server in its launch dialog. With SteamCMD, launch from the installation folder using PalServer.exe -publiclobby on Windows or ./PalServer.sh -publiclobby on Linux. For direct access without a community listing, omit that option and start normally with PalServer.exe or ./PalServer.sh; use the normal launch choice in Steam. To join a listed server, players select Community server on the left of the server list, find the server, and click it. Pocketpair documents these choices in its community server setup guide.
Set Player and Base Limits Separately
These limits control different things. Pick values for your group and host rather than treating a player cap as a base cap. The Steam store page describes dedicated servers for up to 32 players; that does not promise the same capacity on every machine.
| Setting | What It Controls |
|---|---|
ServerPlayerMaxNum | Maximum number of players who can join. |
BaseCampMaxNum | Total bases across the server. |
BaseCampMaxNumInGuild | Bases per guild; default 4, maximum 10. |
BaseCampWorkerMaxNum | Pals per base; maximum 50. |
MaxBuildingLimitNum | Buildings per player; 0 means unlimited. |
Raising the bases-per-guild and Pals-per-base limits increases processing load, according to Pocketpair’s parameter reference. BaseCampMaxNum sets the server-wide base total; it does not replace the guild limit. If you enable bIsUseBackupSaveData, the server creates world backups in a backup directory within the save data and places more load on storage. Those world backups serve a different purpose from the private copy of your configuration file made before editing.
Restart and Check Common Problems
Save the edited PalWorldSettings.ini and restart from the same installation folder: PalServer.exe on Windows or ./PalServer.sh on Linux, adding -publiclobby if you chose a community listing. In Steam, use the corresponding launch choice. Then use a player account to check the intended join route and an observable changed setting, such as the join password or a chosen limit.
- Changes have no effect: Confirm you edited the active
PalWorldSettings.inifor the Windows or Linux installation you started.DefaultPalWorldSettings.iniis a template. - The server is missing from the community list: A normally started dedicated server uses direct IP and port access. Check the Steam launch choice or
-publiclobbyif you want a listing. - The port is wrong:
PublicPortor-publicport=xxxxspecifies the external port for a community server but does not change its listening port. The launch argument-port=8211controls that port; UDP 8211 is the documented default. - A community server cannot be reached from the same home network: A router without Hairpin NAT can prevent that connection. Check this router capability before assuming the configuration file is at fault.
Finish by checking four things: the change is in the active file for the running installation, the launch mode matches the intended join route, the IP and port or community listing can be reached, and the password and limits behave as configured. Pocketpair’s launch arguments and server requirements cover the port and network prerequisites.
Sources
- store.steampowered.com
- store.steampowered.com
- docs.palworldgame.com
- docs.palworldgame.com
- docs.palworldgame.com
- docs.palworldgame.com
- docs.palworldgame.com
- docs.palworldgame.com
- docs.palworldgame.com
- docs.palworldgame.com
Cover Image: Pocketpair · store.steampowered.com
Comments